Creating Active Directory on Oracle Cloud Infrastructure
Active Directory on AWS Active Directory on GCP Active Directory on Azure Office365 Backup Netsuite Backup
In order for you to accomplish AD on OCI, several assumptions are made:
- A secure (nonpublic) connection exists between your on-premises environment and Oracle Cloud Infrastructure (this can either be a Fast Connnect or IPSec VPN connection, as shown in the diagram below).
- You have a domain admin account in the on-premises Active Directory environment (or an account that has permission to both join the domain and install a domain controller).
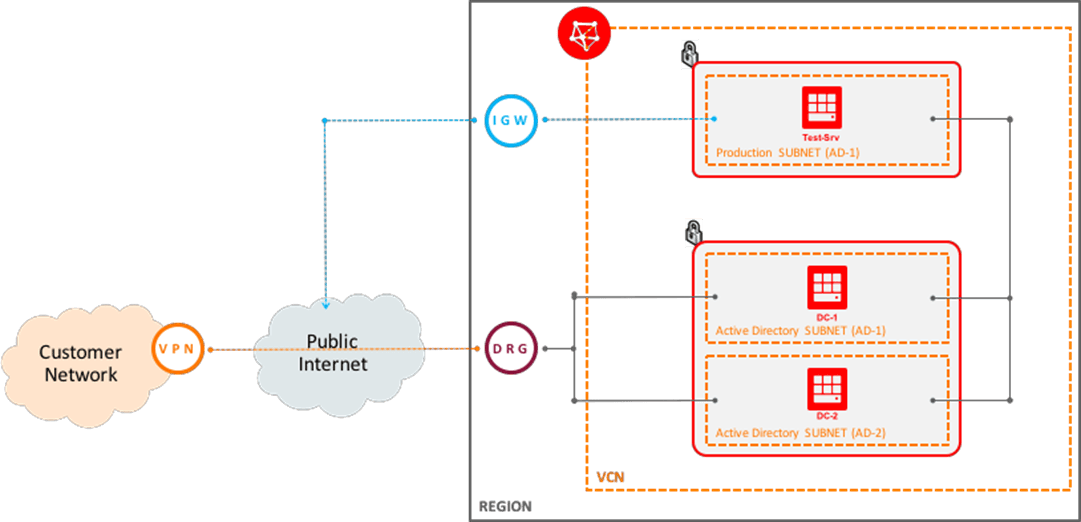
Oracle Cloud Infrastructure can help you build and extend your current Active Directory Forest.
Configuring the Domain Controllers
Install the Active Directory Domain Services Role:
- 1. Log in to the first instance that is to be promoted to a domain controller, using the ADMIN user credentials
(administrator user). - 2. Run Server Manager.
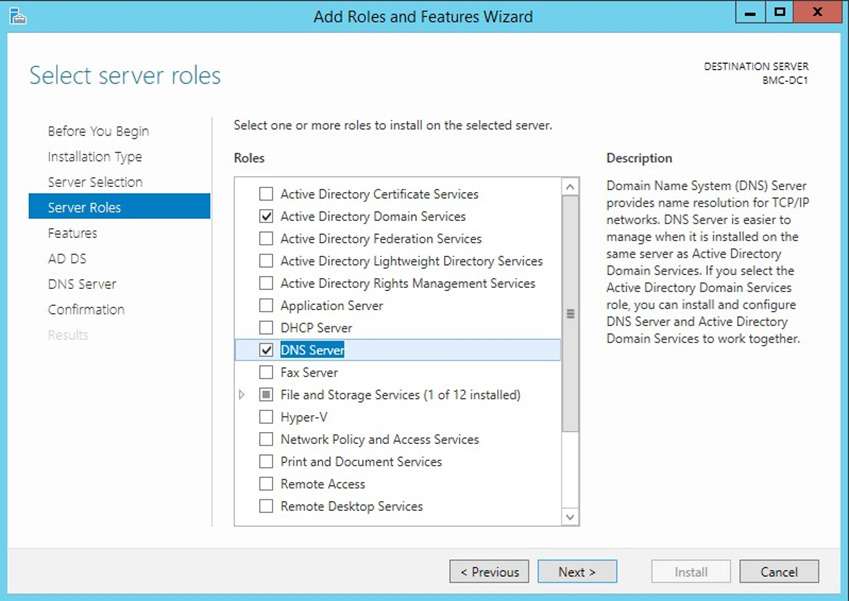
- 3. Click Add Roles and Features.
- 4. Click Next until you get to the Server Role dialog.
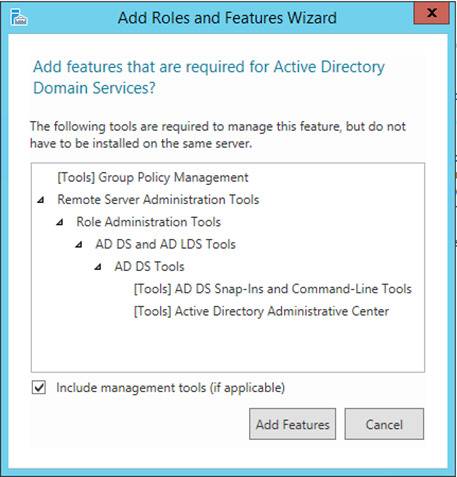
- 5. Select the Active Directory Domain Services checkbox.
- 6. In the dialog box that appears, click the Add Features button.
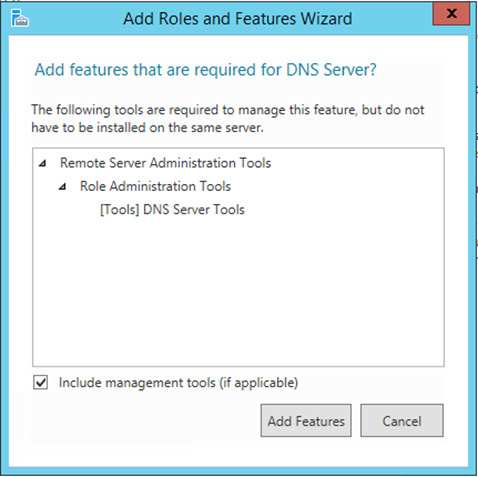
- 7. Select the DNS Server checkbox. (Optional)
- 8. the dialog box that appears, click the Add Features button.
Note: If you selected to install the DNS Server role, you will get a warning dialog box informing you that no static IP addresses were found on the computer. Because the IP address associated with this instance will be associated with it for the life of the instance, you can click the Continue button.
- 9. Once these 2 options have been selected, click Next to continue:
- 10. Click Next until you get to the Confirmation dialog. Check Restart the destination server automatically if required (accept the pop-up dialog box) and click Install:
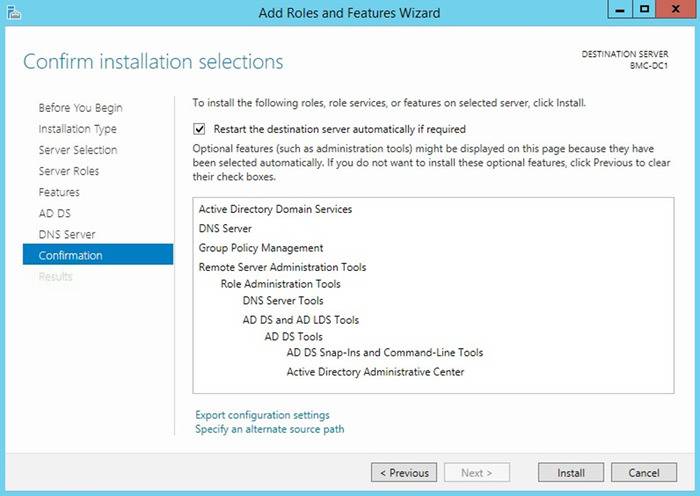
- 11. The installation of the new roles will begin. Once the installation is complete, you can click Close to complete the Add roles and features wizard.
Repeat the steps above for the second domain controller.
Configure DNS
Reconfigure the DNS server to point to the on-premises Active Directory DNS server to promote the domain controller.
Prerequisites:
- Credentials for Windows ADMIN account.
- IP address(es) of the on-premises DNS server(s).
Configure the on-premises DNS server:
- 1. Log in to the first system as the ADMIN user.
- 2. Right-click the Network icon in the right corner of the screen and choose Open Network and Sharing Center.
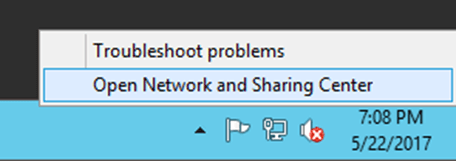
- 3. Click Change adapter settings in the left pane.
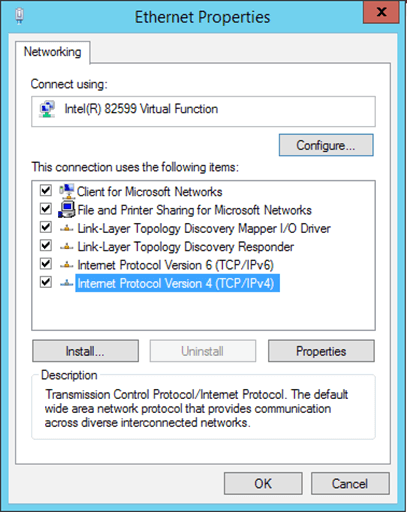
Note: The options appearing in the Network Connections window discussed here are for instance launched as Virtual Machine instances. If you launched the Windows servers as Bare Metal instances, the name of the adapter will be different, however, the steps are the same regardless of instance type. - 4. Right-click the Ethernet network adapter (it should be labeled "Intel(R) 82599 Virtual function") and choose Properties. (For Bare Metal instances, it should be labeled "Intel(R) Ethernet Server Adapter X520-2" or similar.)
- 5. Select Internet Protocol Version 4 (TCP/IPv4) and click Properties.
- 6. Choose Use the following DNS server addresses.
- 7. Enter the IP address(s) of the on-premises DNS server(s) and click OK.
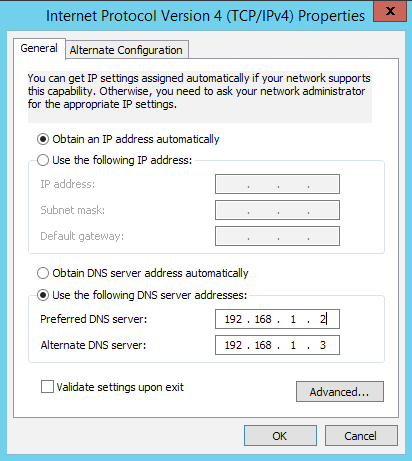
- 8. Click Close.
- 9. You can test that the DNS server is working by either navigating to a public website (assuming that your instance(s) have Internet access) or by running the nslookup command from a command prompt.
Repeat the steps above for the second domain controller.
Join the domain
Now that the DNS server is configured on your instance, you can join the domain.
Prerequisites:
- Credentials for Windows ADMIN account.
- Domain credentials for an account that has permission to join the domain.
- The Fully Qualified Domain Name (FQDN) of the domain to be joined.
Steps:
- 1. Log in to the first system as the ADMIN user.
- 2. Run Windows Explorer.
- 3. Right-click This PC and choose Properties.
- 4. In the Computer name, domain, and workgroup settings section, click Change settings.
- 5. Click Change.
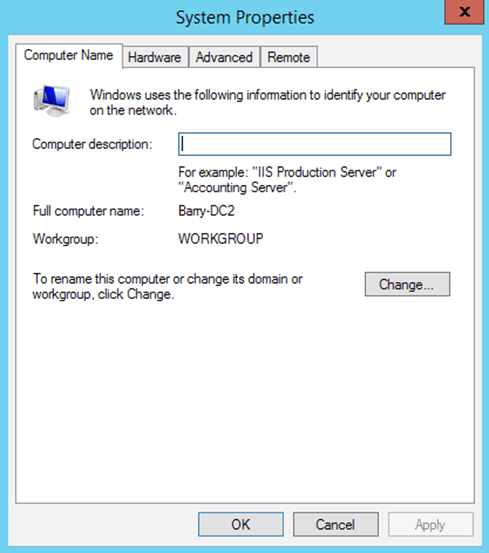
- 6. Select the Domain radio button.
- 7. Enter the FQDN name of the domain that you are joining and click OK.
- 8. If the DNS server is configured correctly, you should be prompted with a dialog box to enter the domain administrator credentials. Enter the credentials and click OK.
- 9. If the credentials are correct and have the appropriate permissions, you should receive a Welcome to the… domain message.
- 10. Click OK to close the dialog.
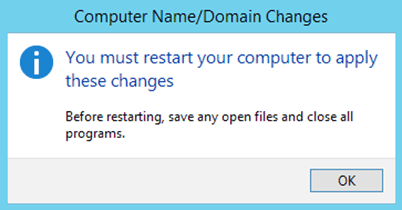
- 11. Another dialog box notifying you that you need to reboot the server will be displayed, click OK.
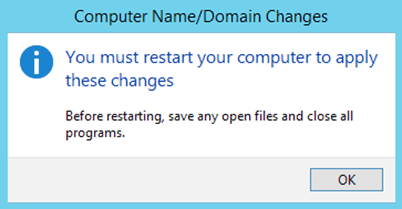
- 12. Click Close to close the System Properties control panel.
- 13. Click Restart Now to restart the server
Repeat the steps above for the second domain controller.
Promote the Domain Controller
Prerequisites:
- Domain credentials for an account that has domain administrator permission to promote a server as a domain controller.
Promote the server to a read-only domain controller:
- 1. Log in to the first system as a domain administrator (or account that has equivalent permissions). You will need to change the username from ".\Admin" to "your_domain\your_domain_admin"
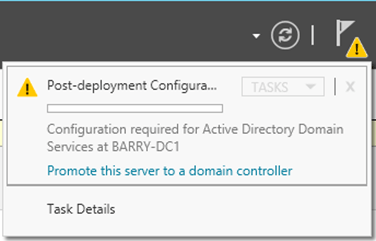
- 2. Run Server Manager.
- 3. You should notice a yellow warning notification icon. Click it and you should see a message stating that configuration is required for Active Directory Services. Click Promote this server to a domain controller.
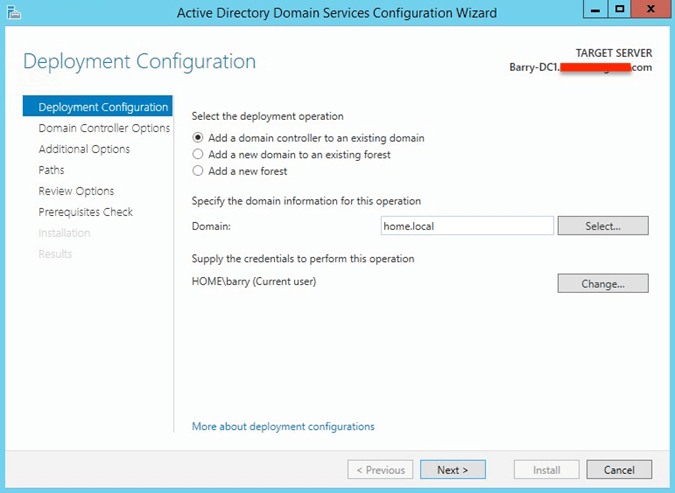
- 4. In the Active Directory Domain Services Configuration Wizard, make sure to Add a domain controller to an existing domain is selected, the correct domain is listed in the Domain field, and the credentials displayed are correct, and click Next.
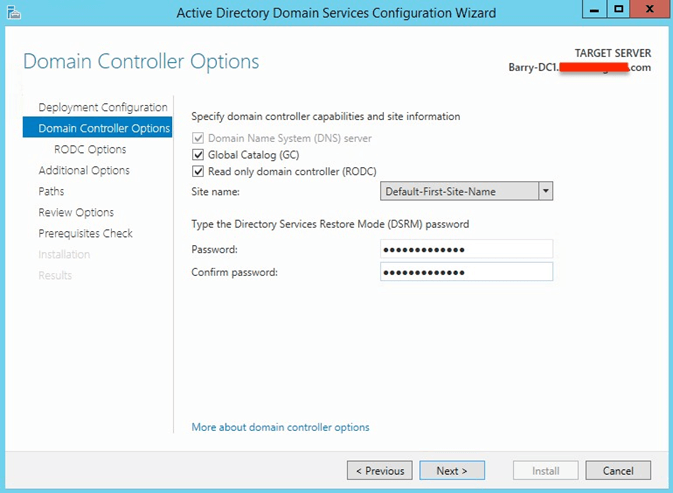
- 5. If this domain controller is to become a read-only domain controller, make sure you check the Read only domain controller (RODC) checkbox, otherwise, leave the checkbox unchecked.
- 6. Enter and confirm a password for Directory Services Restore Mode (DSRM) and click Next.
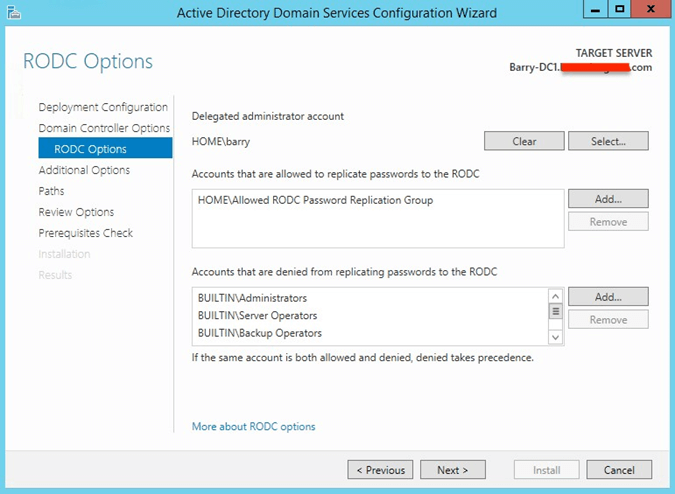
- 7. If you chose to install a read-only domain controller, select Delegated administrator account and list the account(s) that are allowed or denied from replicating passwords to this domain controller and click Next.
- 8. Click Next until you get to the Prerequisites Check step. You may be presented with some warnings on this screen, review the warnings and click Install.
- 9. The server will reboot at the end of the installation process.
Testing Active Directory
Your Oracle Cloud Infrastructure tenancy should now have two read-only domain controllers and you can now test if these domain controllers can be used to both join the domain from the tenancy, and log in to your servers using the domain credentials.
Configure the test instance to use the newly created domain controllers as the DNS server:
- Log in to the test system as the ADMIN user.
- Right-click the Network icon in the right corner of the screen and choose Open Network and Sharing Center.
- Click Change adapter settings in the left pane
Note: The options appearing in the Network Connections window discussed here are for instance launched as Virtual Machine instances. If you launched the Windows servers as Bare Metal instances, the name of the adapter will be different, however, the steps are the same regardless of instance type. - Right-click the Ethernet network adapter (it should be labeled "Intel(R) 82599 Virtual function") and choose Properties. (For Bare Metal instances, it should be labeled "Intel(R) Ethernet Server Adapter X520-2", or similar.)
- Select Internet Protocol Version 4 (TCP/IPv4) and click Properties.
- Choose Use the following DNS server addresses.
- Enter the IP address(s) of the newly created domain controllers (these are the RFC1918 IP addresses you recorded earlier and click OK.
- Click Close.
Next, you can join the test server to the domain:
- Run Windows Explorer.
- Right-click This PC and choose Properties.
- In the Computer name, domain, and workgroup settings section, click Change settings.
- Click Change.
- Select the Domain radio button.
- Enter the FQDN name of the domain that you are joining and click OK.
- If the DNS server is configured correctly, you should be prompted with a dialog box to enter the domain administrator credentials. Enter the credentials and click OK.
- If the credentials are correct and have the appropriate permissions, you should receive a Welcome to the… domain message.
- Click OK to close the dialog.
- Another dialog box notifying you that you need to reboot the server will be displayed. Click OK.
- 11. Click Close to close the System Properties control panel.
- 12. Click Restart Now to restart the server.
Once the server has restarted, you can test that it is now part of the domain by using remote desktop to connect to the server and log in using your domain account rather than the local ADMIN account.