Gluster File System for High Availability Architecture
Customer Relationship Management Project Management Software Online Dispute Resolution (ODR) Healthcare Claims Management ERP Caretaker Warehouse Management System CPQ
Gluster FS is a scalable, distributed file system that aggregates disk storage resources from multiple servers into a single global namespace.
Advantages
- Scales to Several Petabytes: GlusterFS is capable of scaling to handle several petabytes of data efficiently, making it suitable for organizations with large-scale storage requirements.
- Handles Thousands of Clients: GlusterFS is designed to handle a large number of clients simultaneously, ensuring seamless access to data for users across the organization without performance degradation.
- Uses Commodity Hardware: GlusterFS utilizes commodity hardware, which is cost-effective compared to proprietary storage solutions. This allows organizations to build scalable storage infrastructure using readily available and affordable hardware components.
- Allows Optimization for Different Workloads: GlusterFS provides flexibility in optimizing storage configurations for different workloads. Administrators can customize storage volumes and configurations based on specific performance, capacity, and data protection requirements.
- Open Source: Being an open-source solution, GlusterFS offers several advantages, including cost savings, flexibility, and access to a vibrant community of developers and users. Organizations can benefit from ongoing development, updates, and community support without vendor lock-in.
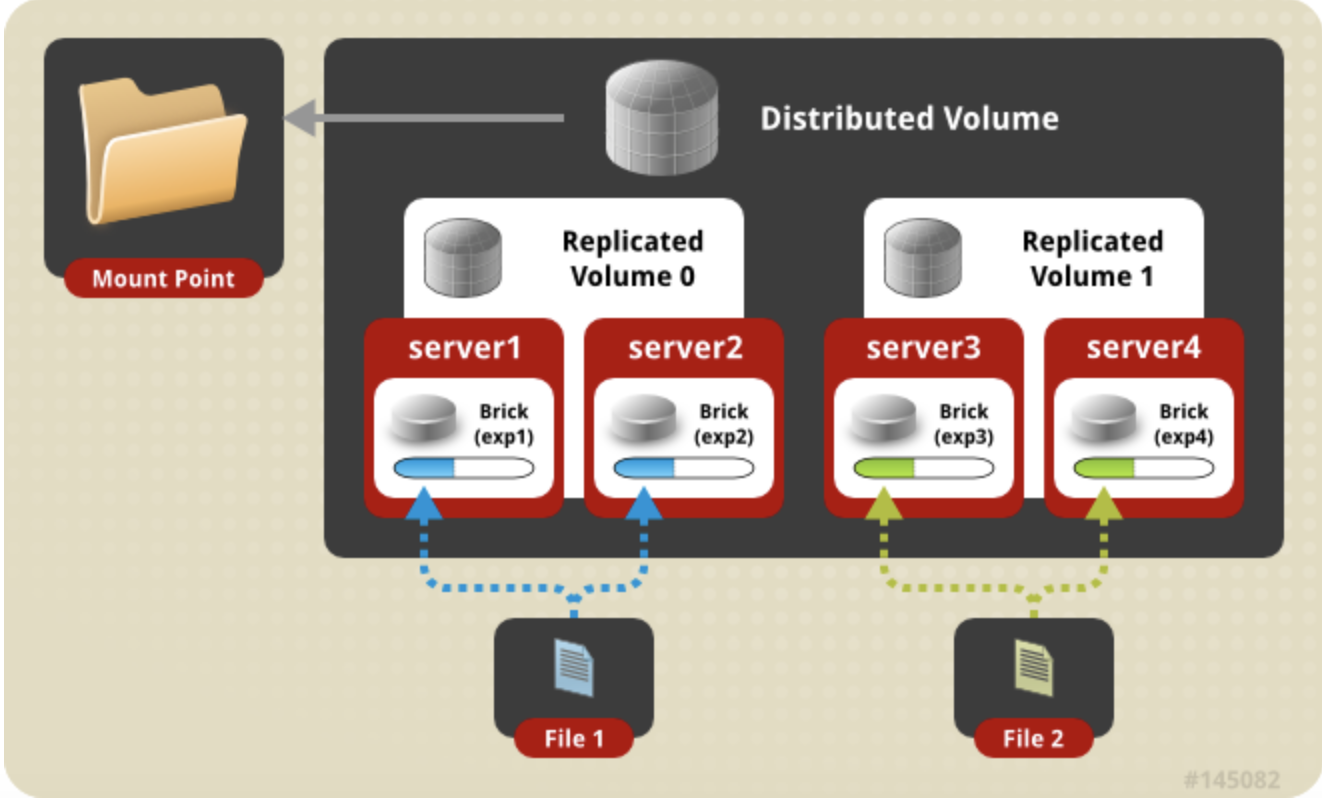
Gluster FS Architecture:
Setup GlusterFS Cluster in Oracle Cloud Infrastructure
Setting up OCI Virtual Machine Instances
- Create two virtual machine instances in OCI. You can create virtual machine instances in OCI using the console or REST apis or any automation tool of your choice. The instructions in this blog work on centos 7 operating system for both VM instances.
- You need to make sure that the two instances that you have created are able to talk to each other. If the two instances are in the same subnet, they should be able to talk to each other automatically. if they are in separate subnets edit the security rule and open the security list to enable the instances in the two subnets to access each other.
- In the interest of this blog, I have named my instances instance01 and instance02.
- Make an entry in the /etc/hosts file with the IP and hostname of both VM instances as shown below. The IP's should be resolvable using the hostnames. Change the IP in the following to your server IP's.
129.45.92.254 instance01
152.38.91.345 instance02 - Create two storage volumes in oci (using oci console) and attach one to each OCI VM instance.
Instance Port Configuration
Open the below ports using security rules in both subnet security lists as well the server firewall if it is enabled
111 - 24007 GlusterFS Daemon
24008 - GlusterFS Management
38465 to 38467 - GlusterFS NFS service
49152 to 60000 - Depends on number of bricks
If you are using Oracle Linux, then follow below additional steps highlighted in purple else skip this one
- Edit file /etc/yum.conf and add a line assumeyes=1 at the last
- Create a file under /etc/yum.repos.d/ by the name of Gluster.repo and add below content in it
[gluster7]
name=Gluster7
baseurl= http://mirror.centos.org/centos/7/storage/\$basearch/gluster-7/
gpgcheck=0
enabled=1 - On all servers - Login as root user and execute below commands-
yum update -y
yum install xfsprogs attr -y
yum install centos-release-gluster -y
yum install glusterfs-server glusterfs-client glusterfs-common -y
vi /etc/sysconfig/selinux and disabled it
systemctl enable glusterd
service glusterd start
firewall-cmd --zone=public --add-port=24007-24009/tcp --add-port=49152-49251/tcp --permanent
firewall-cmd --reload
Create Mount points for OCI Block storage volumes
sudo mkfs -t xfs /dev/sdb
You need to do the following in both the OCI virtual machine instances. Format the volume to xfs.sdb is the name of the oci block storage volumes. You can list the available devices using lsblk command.
Create a mount directory named /gshare and mount the formatted volume
sudo mkdir /gshare sudo mount /share /dev/sdb
Add the mount to /etc/fstab
/dev/sdb /gshare xfs defaults,nofail 0
GlusterFS installation on Virtual machine instances
You need to perform the steps below on both virtual machine instances
- Create a GlusterFs repo.
sudo vi /etc/yum.repos.d/Gluster.repo
Add and enable the following repo
[gluster38]name=Gluster 3.8baseurl=http://mirror.centos.org/centos/7/storage/$basearch/gluster-3.8/gpgcheck=0enabled=1 - Install the glusterFS server on the VM instances
sudo yum install glusterfs-server -y - Start the glusterd service
[opc@instance01 ~]$ sudo systemctl start glusterd
[opc@instance01 ~]$ sudo systemctl status glusterd
Output: glusterd.service - GlusterFS, a clustered file-system serverLoaded: loaded (/usr/lib/systemd/system/glusterd.service;
enabled;
vendor preset: enabled)Active: active (running) since Sat 2020-02-29 03:04:09 GMT;
8s agoDocs: man:glusterd(8)Process: 6556 ExecStart=/usr/sbin/glusterd -p /var/run/glusterd.pid --log-level $LOG_LEVEL $GLUSTERD_OPTIONS (code=exited, status=0/SUCCESS) Main PID: 6557 (glusterd)
CGroup: /system.slice/glusterd.service 6557 /usr/sbin/glusterd -p /var/run/glusterd.pid --log-level INF...Feb 29 03:04:09 instance01 systemd[1]: Starting GlusterFS, a clustered file.....Feb 29 03:04:09 instance01 systemd[1]: Started GlusterFS, a clustered file-...r
Configure the GlusterFS server just installed on both VM instances
From instance01 execute the following command to create a trusted storage pool with instance02.
[opc@instance01 ~]$ sudo gluster peer probe instance02
Output:
peer probe: success.
2. Check the peer status using the following command
[opc@instance01 ~]$ sudo gluster peer status
Output:
Number of Peers: 1Hostname: instance02Uuid: ec83924b-877e-4fe8-b58a-b7541285999fState: Peer in Cluster (Connected)
3. Create a data directory on gshare mount on both virtual machine instances
[opc@instance01 ~]$ sudo mkdir /gshare/data - Create a GlusterFS HA shared volume
[opc@instance01 ~]$ sudo gluster volume create gdata replica 2 instance01:/gshare/data instance02:/gshare/data - Start the gdata volume
[opc@instance01 ~]$ sudo gluster volume start gdata - Create a third virtual machine instance in OCI. You can create virtual machine instances in OCI using the console or REST apis or any automation tool of your choice. The virtual machines instance is also based on Centos 7 operating system. Once the instance is up and running, open the oci console and navigate to this instance and look at the public ip of the newly created instance. The initial three digits of the ip address gives you the CIDR range that needs to be enabled in this step. (e.g. 152* as in this example)
Set the volume permissions for gdata volume for client access. Here I am using 152.* CIDR. You need to replace it based on your network range of your GlusterFS client instance subnet
[opc@instance01 ~]$ sudo gluster volume set gdata auth.allow "152.*" - To get all the info about the volume, execute the following command
[opc@instance01 ~]$ sudo gluster volume info gdata
Output:
Volume Name: gdataType: ReplicateVolume ID: 699ec5a2-55c1-43a2-94c1-2a8779f32d4cStatus: StartedSnapshot Count: 0Number of Bricks: 1 x 2 = 2Transport-type: tcpBricks:Brick1: instance01:/gshare/dataBrick2: instance02:/gshare/dataOptions Reconfigured:auth.allow: 152.*transport.address-family: inetstorage.fips-mode-rchecksum: onnfs.disable: onperformance.client-io-threads: off Start the GlusterFS Client Setup on third instance created in step7 above
1. Enable fuse kernel module
[opc@instanceglusterclient ~]$ sudo modprobe fuse
2. Install all the glusterFS client dependencies
[opc@instanceglusterclient ~]$ sudo yum install fuse fuse-libs openib libibverbs -y
3. Install the GlusterFS client
[opc@instanceglusterclient ~]$ sudo yum install glusterfs-client -y
GlusterFS Client Configuration
The data will be replicated if you are writing from the GlusterFS client. You can mount the GlusterFS volume to any number of clients. A client machine is not part of the glusterFS cluster. It is the machine in which you want to mount the replicated volume.
- Create a client mount directory
[opc@instanceglusterclient ~]$ sudo mkdir /gfdata - Mount gfdata directory to the glusterFS replicated volume
[opc@instanceglusterclient ~]$ sudo mount -t glusterfs instance01:/gdata /gfdata
You are all done !!!! . Your two node GlusterFS is working now !!!!