Configure Microsoft Active Directory Domain Controllers on Google Cloud
Active Directory on AWS Active Directory on OCI Active Directory on Azure Office365 Backup Netsuite Backup
Configuring the Network Environment
Before you create virtual machine instances, you need to create the VPC network and configure it to host a Microsoft Active Directory environment.
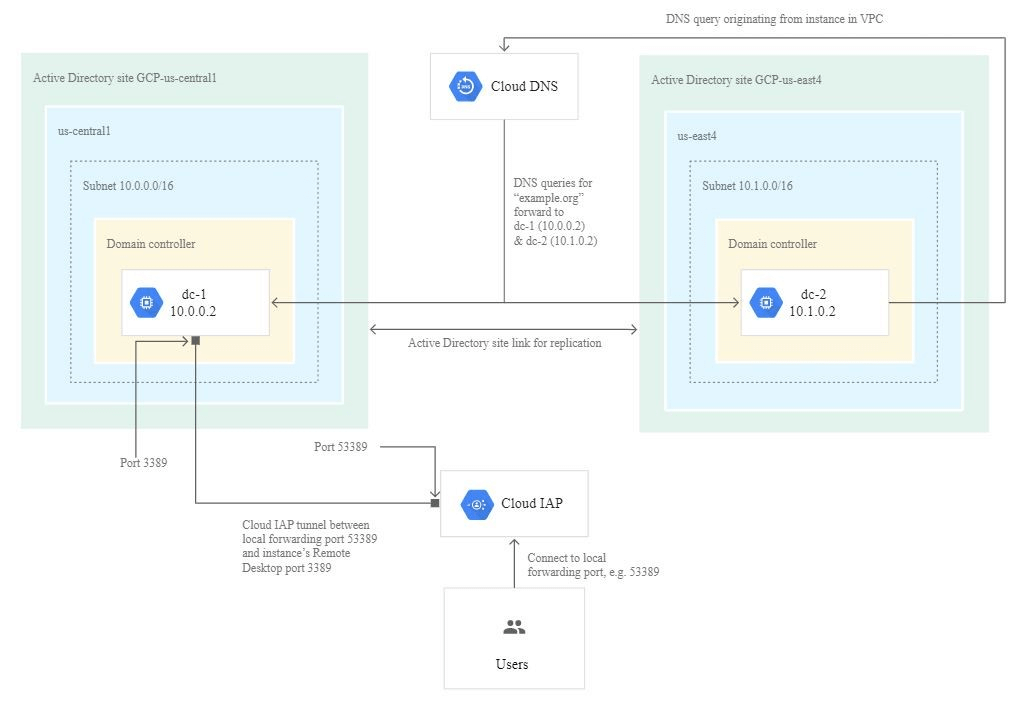
Create the VPC network:
You create your VPC network with subnets in two different regions.
- 1. In the Cloud Console, go to the VPC networks page:
- 2. Click Create VPC network.
- 3. For Name, enter example.
- 4. For Subnet creation mode, choose Custom.
- 5. In the New subnet section, specify the following configuration parameters for the first subnet in us-central1:
- Enter Name, enter example.
- Enter Region, select us-central1.
- Enter IP address range, enter 10.0.0.0/16.
- Under Private Google access, select On.
- Click Done.
- 6. To add another subnet in us-east4, click Add subnet and specify the following configuration parameters:
- For Name, enter example.
- For Region, select us-east4.
- For IP address range, enter 10.1.0.0/16.
- Under Private Google access, select On.
- Click Done.
- 7. Click Create.
Create the domain controller firewall rule:
- In the Cloud Console, go to the Firewall rules page:
- Click Create firewall rule.
- For Name, enter example.allow-dc.
This name must be unique for the project. - For Network, choose example to specify the network where the firewall rule will be implemented.
- For Priority, leave the default value, 1000.
The lower the number, the higher the priority. - For Direction of traffic, choose ingress.
- For Action on match, choose allow.
- For Targets, choose Specified Target tags, and in the Target tags field, enter dc for the tag to which the rule should apply.
- For Source filter, choose IP ranges and enter the following CIDR blocks into the Source IP ranges field to define the source for incoming traffic: 10.0.0.0/8, 172.16.0.0/12, 192.168.0.0/16.
- For Protocols and port, choose Specified protocols and ports to define the protocols and ports to which the rule applies:
a. Select tcp, and enter the following comma-delimited list of ports: 88,135,389,445,464,636,3268,3269,49152-65535.
b. Select udp, and enter the following comma-delimited list of ports: 88,123,389,464.
c. Select Other protocols and include icmp. - Click Create.
Create the DNS firewall rule:
- Click Create firewall rule.
- For Name, enter example.allow-dns.
This name must be unique for the project. - For Network, choose example to specify the network where the firewall rule will be implemented.
- For Priority, leave the default value, 1000.
The lower the number, the higher the priority. - For Direction of traffic, choose ingress.
- For Action on match, choose allow.
- For Targets, choose Specified Target tags, and in the Target tags field, enter dns for the tags to which the rule should apply.
- Choose IP ranges for the Source filter, and type the following CIDR blocks into the Source IP ranges field to define the source for incoming traffic: 10.0.0.0/8, 172.16.0.0/12, 192.168.0.0/16, 35.199.192.0/19.
- For Protocols and ports, choose Specified protocols and ports to define the protocols and ports to which the rule applies:
a. Select tcp, and enter the following port: 53.
b. Select udp, and enter the following port: 53. - Click Create.
Create the Remote Desktop firewall rule:
- Click Create firewall rule.
- For Name, enter example.allow-rdp.
This name must be unique for the project. - For Network, choose example to specify the network where the firewall rule will be implemented.
- For Priority, leave the default value, 1000.
The lower the number, the higher the priority. - For Direction of traffic, choose ingress.
- For Action on match, choose allow.
- For Targets, choose Specified Target tags, and in the Target tags field, enter rdp for the tags to which the rule should apply.
- Choose IP ranges for the Source filter, and then type the following CIDR block into the Source IP ranges field to define the source for incoming traffic: 35.235.240.0/20.
- For Protocols and port, choose Specified protocols and ports, select tcp, and then enter the port, 3389.
- Click Create.
Create the Cloud DNS private forwarding zone
- In the Cloud Console, go to the Cloud DNS page:
- Click Create zone.
- For Zone type, choose private.
- For Zone name, enter example-org.
- For DNS name, enter example.org.
- Select Forward queries to another server to configure forwarding destinations.
- For Destination DNS servers, enter the following addresses: 10.0.0.2, 10.1.0.2.
- Under Network, choose an example to specify the network where the forwarding zone will be applied.
- Click Create.
Launching the Domain Controller Instances:
Launch the initial domain controller instance in us-central1:
- In the Cloud Console, go to the VM instances page:
- Click Create instance and specify dc-1 as the name for your instance.
- For Region, select us-central1.
- Take note of the Zone value. You need it later.
- For Machine type, select 2 vCPUs for the n1-standard-2 machine type.
- Under Boot disk, click Change to select your boot disk image, and then do the following:
a. In the Boot disk dialog, select Windows Server 2019 Datacenter under OS images.
b. For Boot disk type, select Standard persistent disk.
c. For Size (GB), specify 50.
d. Click Select to finalize your boot disk choices. - Expand the Management, security, disks, networking, sole tenancymenu.
- Click Networking, and then do the following:
a. For Network tags, enter the following tags to apply relevant firewall rules to your instance: dc, dns, rdp.
b. For Networking interfaces, click the edit icon to edit the default interface.
c. For Network, select the example VPC network.
d. For Primary Internal IP, select Reserve Static IP address.
e. In the Reserve a static internal IP address dialog, enter dc-1 For Name.
f. For Static IP address, select Let me choose.
g. For Custom IP address, enter 10.0.0.2.
h. Click Reserve.
i. For External IP, select None to prevent assignment of an external IP address.
j. Click Done. - Click Create.
Launch the second domain controller instance in us-east4:
- In the VM instances page, click Create instance and specify dc-2 as the name for your instance.
- For Region, select us-east4.
- Take note of the Zone selected here. You need it later.
- For Machine type, select 2 vCPUs for the n1-standard-2 machine type.
- Under Boot disk, click Change to select your boot disk image.
a. In the Boot disk dialog, under OS images, select Windows Server 2019 Datacenter.
b.For Boot disk type, select Standard persistent disk.
c.For Size (GB), specify 50.
d.Click Select to finalize your boot disk choices. - Expand the Management, security, disks, networking, sole tenancymenu.
- Click Networking.
a. For Network tags, enter the following tags to apply relevant firewall rules to your instance: dc, dns, rdp.
b. For Networking interfaces, click the edit icon to edit the default interface.
c. For Network, select the example VPC network.
d. For Primary Internal IP, select Reserve Static IP address.
e. In the Reserve a static internal IP address dialog, enter dc-2 For Name.
f. For Static IP address, select Let me choose.
g. For Custom IP address, enter 10.1.0.2.
h. Click Reserve.
i. For External IP, select None to prevent assignment of an external IP address.
j. Click Done. - Click Create.
Connecting to an instance using IAP for TCP Forwarding
Establish the RDP connection to dc-1:
- Using your Remote Desktop client of choice, connect to dc-1 by specifying localhost or 127.0.0.1 for the remote address and 53389 as the remote port.
- When you're prompted, enter the Username and password you created in the previous procedure.
- When you later disconnect from the instance, you must press Control+C to cancel the gcloud beta compute start-iap-tunnel command and close the tunnel.
Promoting the Initial Domain Controller
After connecting to dc-1, you can work in your RDP windows to enable the local administrator account, install Active Directory Domain Services, and configure the instance as a domain controller in a new Active Directory Forest.
Enable the local administrator user
- In dc-1, open Server Manager, and then select the menu item Tools > Computer Management.
- In the left-hand navigation pane, under Computer Management (Local) > System Tools, expand Local Users and Groups, and then select the Users folder.
- Right-click Administrator, and then select Set Password.
- In the Set Password for Administrator dialog, click Proceed.
- Enter and confirm a strong password, and then click OK twice.
- Right-click Administrator, and then select Properties.
- On the General tab, clear Account is disabled.
- Click OK.
- Close Computer Management.
Install Active Directory Domain Services:
- In dc-1, open Server Manager, and select the menu item Manage > Add Roles and Features.
- In the Before You Begin page, click Next.
- In the Installation Type page, click Next.
- In the Server Selection page, click Next.
- In the Server Roles page, under Roles, select Active Directory Domain Services.
- In the Add Roles and Features Wizard popup, click Add Features.
- click Next.
- In the Features page, click Next.
- In the AD DS page, click Next.
- In the Confirmation page, click Install.
- After installation completes, click Close.
Configure dc-1 as a domain controller:
- Click the Notifications flag icon at the top of the Server Manager window.
- In the Post-deployment Configuration notification, click Promote this server to a domain controller.
- In the Active Directory Domain Services Configuration Wizard, under Select the deployment operation, choose Add a new forest.
- For Root domain name, enter example.org.
- click Next.
- In the Domain Controller Options page, enter and confirm a strong password for the Directory Services Restore Mode (DSRM) password.
- click Next.
- In the DNS Options page, click Next.
- In the Additional Options page, click Next.
- In the Paths page, click Next.
- In the Review Options page, click Next.
- In the Prerequisites Check page, after the checks are completed, click Install.
Because the instance automatically restarts after installation, you are disconnected from your RDP session.
Configuring Active Directory sites and replication
In this section, you reconnect to dc-1 to configure Active Directory sites and replication, this time using domain administrator credentials.
Configure Active Directory sites:
- Connect to dc-1 as before by using the local forwarding port, but this time use domain administrator credentials:
a. For Username, enter example\administrator.
b. For Password, enter the password you previously assigned to the local administrator account on dc-1. - In Server Manager, select the menu item Tools > Active Directory Sites and Services.
- In the left-hand navigation pane, under Active Directory Sites and Services, right-click Sites, and then select New Site.
- For Name, enter GCP-us-central1.
- Under Select a site link object for this site, select DEFAULTIPSITELINK.
- Click OK twice.
- Repeat steps 3-6 to create a similar site named GCP-us-east4.
Configure site links for Active Directory replication:
- In the left-hand navigation pane, under Active Directory Sites and Services > Sites, expand nter-Site Transports.
- Right-click IP, and then choose New Site Link.
- For Name, specify GCP-us-central1-us-east4.
- Under Sites not in this site link, highlight both GCP-us-central1 and GCP-us-east4.
- Click Add to move the sites into Sites in this site link.
- Click OK.
- In the left-hand navigation pane, under Active Directory Sites and Services > Sites > Inter-Site Transports, select IP.
- Right-click the new site link GCP-us-central1-us-east4, and then choose Properties.
- For Cost, enter 250.
- For Replicate Every, enter 15 minutes.
- Click OK.
Configure subnets for Active Directory sites
- In the left-hand navigation pane, under Active Directory Sites and Services > Sites, right-click Subnets, and then select New subnet.
- For Prefix, enter 10.0.0.0/16.
- Under Site Name, select GCP-us-central1.
- Click OK.
- Repeat steps 1-4 to create a similar subnet for 10.1.0.0/16 and site GCP-us-east4.
Add dc-1 to the appropriate site (GCP-us-central1)
- In the left-hand navigation pane, under Active Directory Sites and Services > Sites, expand Default-First-Site-Name > Servers, and expand GCP-us-central1.
- Drag dc-1 from Default-First-Site-Name > Servers to GCP-us-central1 > Servers.
- In the Active Directory Domain Services confirmation dialog, click Yes.
Promoting Additional Domain Controllers
Configure dc-2 as a domain controller:
- Click the Notifications flag icon at the top of the Server Manager window.
- In the Post-deployment Configuration notification, click Promote this server to a domain controller.
- In the Active Directory Domain Services Configuration Wizard, under Select the deployment operation, choose Add a domain controller to an existing domain.
- For Domain, enter example.org.
- Under Supply the credentials to perform this operation, click Change.
- In the Windows Security dialog, specify your domain administrator credentials:
a. For Username, enter example\administrator.
b. For Password, enter the password you previously assigned to the local administrator account on dc-1. - Click OK to close the dialog.
- click Next.
- In the Domain Controller Options page, under Site name, verify that GCP-us-east4 is selected.
- Enter and confirm a strong password for the Directory Services Restore Mode (DSRM) password.
- You can use the same DSRM password that you specified for dc-1. In any case, remember this password. It can be useful if you need to repair or recover your domain.
- click Next.
- In the DNS Options page, click Next.
- You might see the warning, A delegation for this DNS server cannot be created because the authoritative parent zone cannot be found. You can disregard this warning because the forwarding zone in the preceding Cloud DNS configuration serves the same purpose as the delegation mentioned in the warning.
- In the Additional Options page, click Next.
- In the Paths page, click Next.
- In the Review Options page, click Next.
- In the Prerequisites Check page, after the checks are completed, click Install.
Testing the Active Directory Configuration
Test the domain controller configuration by launching a new test instance into the environment and joining it to the domain.
Launch the test instance us-central1
- In the Cloud Console, go to the VM instances page:
- Click Create instance and specify test-1 as the name for your instance.
- For Region, select us-central1.
- Take note of the Zone value. You need it later.
- For Machine type, select 2 vCPUs for the n1-standard-2 machine type.
- Under Boot disk, click Change to select your boot disk image, and then do the following:
a.
b. In the Boot disk dialog, under OS images, select Windows Server 2019 Datacenter.
c. Under Boot disk type, select Standard persistent disk.
d. For Size (GB), specify 50.
e. Click Select to finalize your boot disk choices. - Expand the Management, security, disks, networking, sole tenancy menu.
- Click the Networking section header, and then do the following:
a. Enter the following Network tags to apply relevant firewall rules to your instance, rdp
b. Under Networking interfaces, click the edit icon to edit the default interface.
c. Under Network, select the example VPC network.
d. For External IP, select None to prevent assignment of an external IP address.
e. Click Done. - Click Create.
Connect to the Test Instance:
In this section, you get credentials for a local user on test-1 and then connect to the test instance server.
Connect to the test instance server test-1
a. At your local command prompt, start a tunnel using IAP and the gcloud CLI:
- gcloud beta compute start-iap-tunnel test-1 3389 \
--zone=zone \
--project=project-id
As the g-cloud CLI initializes the tunnel for TCP forwarding, you see output similar to the following
- Testing if tunnel connection works.
Listening on port [17148].
- b. Use your preferred Remote Desktop client to connect to localhost (127.0.0.1) on the port specified in the output of the previous command. It might be different than the example port 17148.
- c. When prompted for credentials, enter the username and password for the local user from the previous procedure.
Join the Test Instance to the Domain:
- In the Remote Desktop window, join the instance to the example.org domain. Click Local Server in the left-hand navigation pane of the Server Manager window.
- Under Properties For test-1, click the WORKGROUP link.
- On the Computer Name tab of the System Properties dialog, click Change.
- In the Member of section, select Domain, and then enter example.org.
- Click OK.
- When prompted for credentials, specify example\administrator along with the previously chosen domain administrator password, and Click OK.
- Click OK, OK, Close, and finally Restart Now, and you are done.